3 Ways to Beat June Gloom

Most people think that we always have perfect weather here in Southern California, but then they visit in June... Meet June Gloom.

JuneGloom

June Gloom is the affectionate name for the heavy clouds and cooler weather that we experience most Junes due to some science stuff (cool waters and higher atmospheric pressure). Sometimes June Gloom comes early and we get May Grey. All this dreary weather can really put a damper on your mood. This week we're going to talk about 3 ways to beat June Gloom. 

  1. Exercise more
  2. Eat better foods
  3. Get adjusted

Exercise is a great way to combat the woes of June Gloom. Studies show that exercise can help with treating and preventing depression. Exercise doesn't have to be super intense to get the benefits either. As little as 20-35 minutes a day of low level activities have been shown to help with feelings of depression. Need some motivation to exercise? Call a buddy! Find a group to exercise with! There are lots of free fitness groups around. You can also garden as a form of exercise. The cloudy skies and cooler weather are a great time to get out and dig in the dirt! Or make a deal with your pet to take it on daily walks. 

Eating better foods can also do wonders on your mood. The central nervous system (your brain and spinal cord) interacts a lot with your enteric nervous system (more than 100 million nerve cells lining your gastrointestinal tract from esophagus to rectum).  Older research thought that depression and anxiety could lead to irritable bowel syndrome (IBS) and other gastrointestinal complaints, but new research shows that it could be the other way around! So feed your body whole foods that aren't processed. Go for lean, grass fed meats or wild caught fish. Fill up on vegetables and fruits. Try kombucha for giving your gut good bacteria (probiotics) to help with digestion of nutrients. 

Lastly, get adjusted! Chiropractic adjustments keep you moving well! When you can move better, you feel better! And don't forget to focus on good posture still even though Posture Month is over. 

Summer Kick Off (Nutritious Style)

It's Memorial Day weekend! Some say that's the unofficial start to summer! To me summer always means grilling season. (Although here in Southern California our weather affords grilling year round).  I often forget about the variety vegetables you can cook on the grill. From a nutrition standpoint, I try to fill half of my plate with vegetables every meal. This week I'll go over some vegetable cooking tips and my favorite veggies to throw on the grill.

https://allspiceandyum.com/tag/grilled-vegetables/

Grilling Veggies 101

  1. Oil them up! Vegetables will dry out on the grill, so the oil helps that a bit. A light brushing of oil or gently tossing the veggies in oil works well. Oil also is helpful with getting any seasonings to stick to the vegetables. (I personally like a gentle sprinkle of salt and garlic powder.) Also - all oils aren't created equally! I usually just use some cold pressed olive oil.
  2. Consider cooking times! Not all vegetables take the same amount of time to cook on the grill. If you are grilling bigger denser vegetables, they will take more time! Consider cooking them over a lower heat area of the grill for longer to ensure equal warmth throughout. Smaller thinner vegetables will cook faster, so save them for last. This is also affected by how you may chop up the vegetables.
  3. Don't lose the veggies! Some vegetables are small and can fall through the grates. Consider a grill basket (or a fake tin foil basket/packet) or skewers to manage your veggies on the grill. Also when you are cutting up bigger vegetables - cut them into pieces that will skewer well or work well in the grill basket.

Best Grilling Veggies

  • Asparagus
  • Mushrooms
  • Broccolini
  • Eggplant
  • Bell peppers
  • Tomatoes (can work on a skewer in wedges or wrap in tin foil)
  • Zucchini (try seasoning them with olive oil and lemon juice)
  • Onions (cut in wedges for a skewer or in thin slices for burgers)
  • Potatoes (or sweet potatoes)

5 Stretches/Exercises to Better Posture

May has been all about posture and bikes. Bikes and posture. They are two things that Dr. Emily is pretty passionate about. We've said it before, and it still holds true--good posture isn't a sometimes thing; it's an all the time thing. With all of our constant use of technology, it's really easy to practice bad posture. I'm going to alter the famous Will Durant quote to read, "we are what we repeatedly do. [Bad posture], then, is not an act, but a habit."

Like any bad habit though, we can fight it and correct it! This week, we are going to talk about five stretches/exercises to give you better posture. When doing these keep in mind that none of these should hurt or cause you pain. A stretching feeling is ok, but if these are painful, STOP!

1. Pectoralis Stretch
Option 1 - Doorway Stretches
Standing in a doorway (or park shelter post), position your arm and shoulder at 90° angles. Rest your hand and forearm along the door, and move your body forward until you feel a stretch in your pectoral muscles. Hold for 20-30 seconds. Repeat on the other side. Perform 3-4 times throughout the day.

Pec Stretch

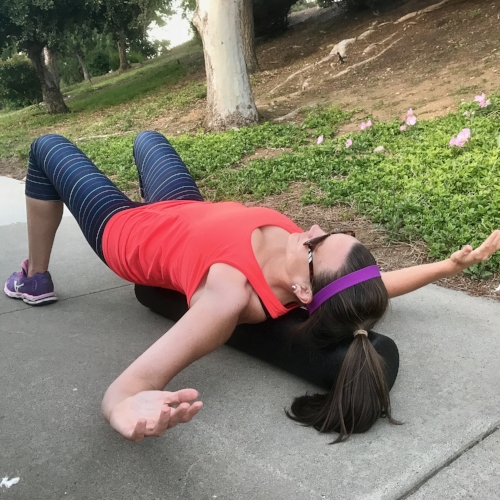
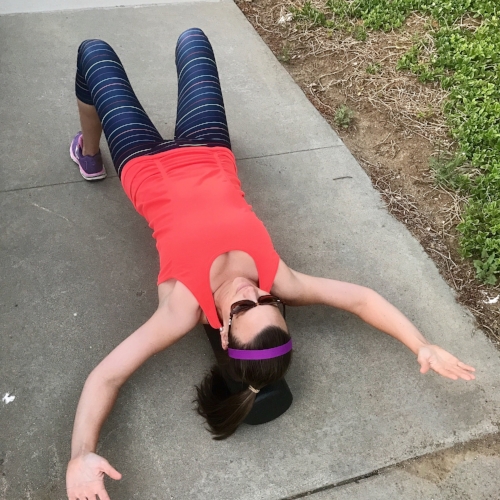
Option 2 - Foam Roller Gravity Assisted Stretches
This works best if you have a long (36") foam roller. Lay the foam roller on the ground, then lay on top of the foam roller, so your spine is on top of the foam roller. Bring your shoulders up to make a 90° angle with your body and bend your elbows so they also form a 90° angle. Then let gravity do its thing and open up your chest. You can play with the angles of your shoulders/arms a bit to find the key stretch for you. Hold this for 20-30 seconds. Perform 3-4 times throughout the day. 

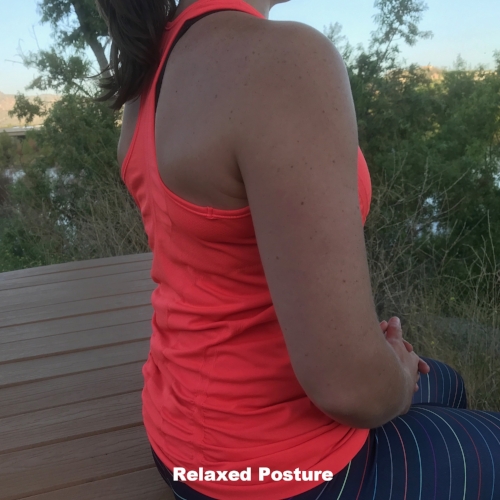
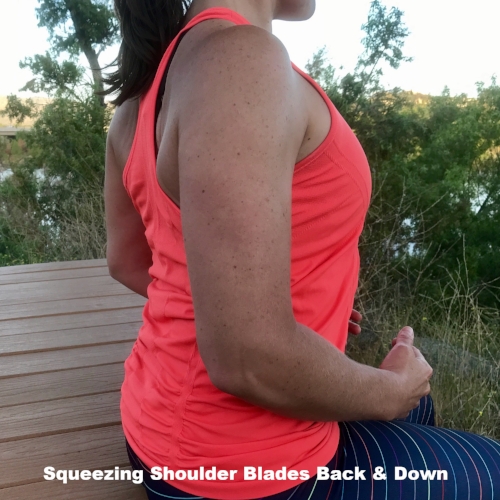
2. Shoulder Blade Squeeze
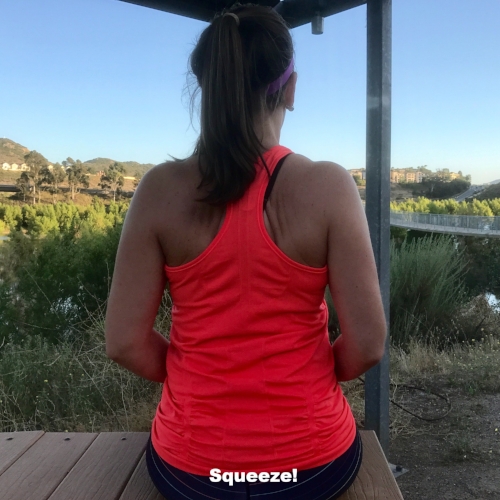
Sitting on a chair, let your arms just relax by your side comfortably. From this position, think of squeezing your shoulder blades together. Make sure you keep you shoulders relaxed. Think of squeezing the shoulder blades BACK and DOWN. I like to visualize trying to hold a marker between my shoulder blades. Hold the squeezed position for 8 seconds before releasing. Repeat 5 times. Perform these sets 3-4 times throughout the day.  

3. Upper Trapezius Stretch
Start from a sitting position. Slowly bring your right ear towards your right shoulder. Place your right hand over the top of your head to provide some gentle pressure for an added stretch. You can also sit on the palm of your left hand to add more of a stretch. Hold this stretch for 20-30 seconds. Repeat on the other side. Perform 3-4 times throughout the day. 

4. Levator Scapulae Stretch 
This is very similar to the stretch for your upper trapezius. Again, start from a seated position. Slowly bring your chin down and to the right as if you are trying to smell your right under arm (mine smells like spring flowers). Place your right hand over the top of your head to provide some gentle pressure for an added stretch. Hold for 20-30 seconds. Repeat on the other side. Perform 3-4 times throughout the day. 

5. Overhead Stretch
From a standing or seated position, move your arms out in front of you. Interlace your fingers, turn your palms away from you, straighten your arms, then move them overhead. Press out through your hands to keep your arms straight. When performing, try and keep your core muscles working, so you don't arch your back. Hold this position breathing deeply through your belly (see last week's post) for 20-30 seconds. Perform 3-4 times throughout the day. 

Those aren't so bad! You can do them at home, at work, and anywhere in between (like when you're out hiking with friends and bribe them to take photos for your blog)! And now we can reword that quote to say, "we are what we repeatedly do. [Good posture], then, is not an act, but a habit." Make good posture a habit for you! 

Still need some convincing to work on your posture? Studies show that people with upright posture feel more enthusiastic, excited, and strong! Good posture is also associated with higher self-esteem, less social fear, and fewer negative emotions! 

Breathing 101

Breathing 101? I’ve been breathing since day 1, I think I’ve gotten this whole breathing thing down. Breathe in, breathe out, repeat. What else is there?

A lot of different factors led to this post. One – May is National Posture Month! Studies show that poor posture can decrease your lung capacity by up to 30%. Also breathing improperly can lead to other musculoskeletal issues that you may not even realize are a result of poor breathing mechanics.

I always like the saying “good posture is its own reward.” Being able to use your full lung capacity is always a plus! Being able to use it correctly is also helpful!

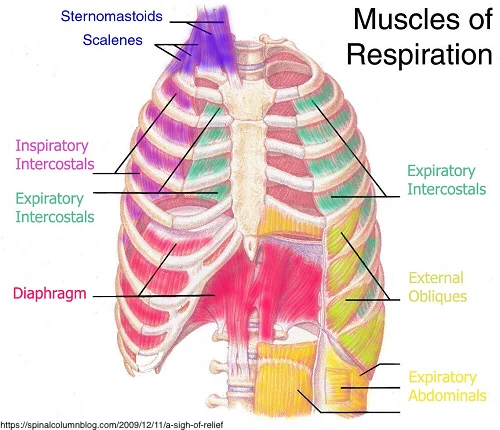
Time to dig into some anatomy. Check out the image below of all the muscles that are involved in breathing!

Muscles of Respiration

The diaphragm is that big huge pink colored muscle in the bottom of the picture. Ideally it does most of the work for breathing. That makes sense, it’s a big muscle, and it covers the whole bottom surface of the lungs. Using the diaphragm to breathe, pulls down on the bottom part of the lungs pulling air into the lungs.

The purple muscles at the top of the picture, the sternocleidomastoid (SCM) and scalenes, are the accessory muscles of respiration. They are supposed to be used during times of increased demand like fight or flight. If you start relying on these muscles all the time instead of just those high need times, those small muscles will start to fatigue and can cause other problems. When the scalenes get over used and are too tight, they can start irritating the nerves that travel near them. One potential side effect is thoracic outlet syndrome. When the sternocleidomastoid muscle is over used, you can develop trigger points (knots) that can occasionally refer pain to different areas of your head.  The image below is an example of the referred pain some people experience from trigger points in the sternocleidomastoid.

SCM Trigger Points

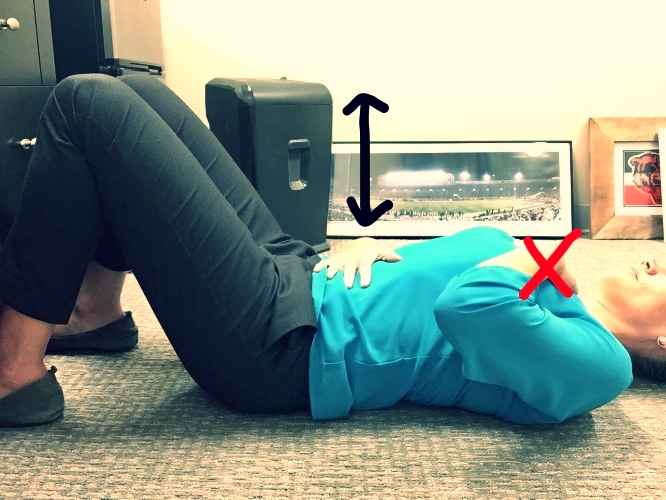
So now that we’ve covered why you should work on diaphragmatic breathing, let’s get in to the HOW! Dr. Emily feels that the easiest place to start is laying on the floor with a hand over your chest and a hand over your stomach. Then you just breathe. While you are breathing, focus on keeping the hand on your chest still, and drawing in the breath from your belly. Then you can think of tightening your stomach muscles as you exhale.

How to Breathe

Dr. Emily feels that the easiest way to start incorporating these breathing exercises into your life are first thing in the morning and the last thing before you go to bed at night. Lay in bed and practice breathing for 5-10 minutes in the morning and the evening. As you get better at this, you can practice while sitting, too. To perform these exercises while sitting, you put your hands on your chest and belly, and practice breathing keeping your chest still. You slowly increase the amount of times practicing your breathing, and eventually it will become your norm.  

Happy breathing!

Homework for Your Muscles

Workouts and training sessions are important, but recovery is just as important. If you don't take care of your body post training session, you'll be more prone to injury. No one likes getting hurt! 

Here are the 3 things that Dr. Emily thinks are key tools for muscle homework:

  1. The Stick
  2. Lacrosse ball
  3. Water
tools for muscle homework

The stick is great for rolling out muscles. Rolling out muscles? What does that mean? Rolling out muscles is a way to elongate your muscle fibers. It helps to work on muscle trigger points (muscle knots/kinks), too. This helps to keep the muscle fibers relaxed, happy, and functioning optimally. Dr. Emily also recommends foam rolling, but the stick is nice because it is smaller and easy to stash in your briefcase/backpack/large purse. This means you can easily pack it to take care of those sore muscles during some down time in the office. Reading emails in the office? You can use the stick on your leg muscles. Here are some tips on how to use The Stick on your muscles. 

The Stick Instructions

The Stick is great for broad muscle relief, but sometimes you just have that spot that hurts deeper that the stick can't get. That's where the lacrosse ball comes into play. Dr. Emily likes using the lacrosse to roll out the bottoms of her feet. To do this, just place the lacrosse ball under your foot (like below), and move your foot back and forth on top of the ball. 

Lacrosse Ball Foot Massage

You can also use this on the sore spots in your legs or gluteal region. Find those sore spots rolling on top of the ball, and just hang out on them. Let your muscles just release and relax on top of the ball. Don't neglect your upper body, too! 

Lastly, don't forget to hydrate! It's easy to remember to drink water after exercise, but after working out the muscles with The Stick or a lacrosse ball, you also need to hydrate. Drink a lot of water to help flush out the muscles.